WordPress is one of the most well known free CMS for Blog available in the internet. If you want to use it instantly and free, you can go to www.wordpress.com. Just register and use it. It’s very easy. The problem is, you can’t use your own “themes”, do CSS modification or add “google adds” because it’s not allowed.
As an alternative, WordPress gives a free CMS which can be modified to your need. It’s available to be downloaded at http://wordpress.org.
In this article, I will show you how to install and run WordPress on XAMPP.
Before we start, I assume that you have installed XAMPP in your system and familiar with Linux Terminal.
Step 1. Download WordPress CMS.
Open your web browser and type “http://wordpress.org” in the URL box to open WordPress.org website. Then click “Download WordPress 2.5.1”. The version may be different if the new version is release.

Save to your download directory.
Step 2. Installation
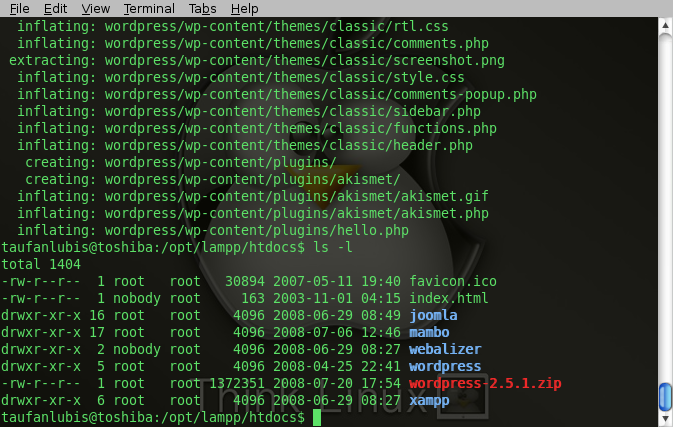
Copy the WordPress CMS file from your download directory to /opt/lampp/htdocs/.

Extract the WordPress Installation file.

If the extraction is success you will have a new ‘wordpress’ directory.
Start your XAMPP server.

Open your web browser and type “localhost/wordpress” to run the installation setup.

Wordpress need a wp-config.php file before it can start the installation process. It’s a normal error. Just ignore it and click ‘Create a Configuration file‘.

This error below occurs when you don’t have a ‘write‘ permission to your WordPress directory. So, we have to set the permission first before we can continue the installation process.

Go back to your Linux Terminal.
To change the permission for WordPress directory, goto “/opt/lampp/htdocs/” using ‘cd‘ command and use ‘chmod og+w‘ command to give a write permission to the WordPress directory.

Go back to your web browser and click ‘previous’ button to go back to the first installation page. Now, click again the ‘Create a Configuration File‘ button.

Welcome to WordPress installation setup. Click ‘Let’s go’ button to continue.

Enter your Database name, User Name and Password. The database Host you don’t need to change. Most all web server use this default. Table prefix you need to change also.

Click ‘Submit’ button to continue.
If you got the same error like below is OK. We can fix it. This error occurs because WordPress installation can not create the database file.

Open new tab in your browser, type ‘localhost’ and press ‘Enter’. You will have a XAMPP main screen. Click ‘phpMyAdmin’ button to open ‘phpMyAdmin’ screen.

Click your WordPress ‘database name‘ at ‘database’ text box, type your database name and click ‘Create’ button.

You have the WordPress database already.

Close the ‘phpMyAdmin’ and ‘XAMPP’ screen, go back to your “WordPress’ screen and click ‘Previous’ button at your browser to go back to the screen below.
Click ‘Submit’ button to continue.

Now, the WordPress installation can connect to the database that you have created with phpMyAdmin.
Click ‘Run the install’ button to continue the installation process.

Enter your Blog Title and your Email then click ‘Install WordPress’ button.

Write down your Username and Password otherwise will not be able to access the WordPress ‘administrator’ page later on. The password is randomly created by WordPress installation. So, my one will be different with yours. Then click ‘Log in’ button to continue.

The screen below is your first “Log in” to your WordPress. Enter the Username and Password that you wrote down before and click ‘Log in’ button.

This is the Administrator screen of WordPress. If you see on the screen, there 3 buttons on the top right, ‘Settings, Plugins and Users’. Click ‘Users’ button.

You will have a ‘Manage Users’ screen. Click ‘Your Profiles‘ button.

This is ‘Your Profile and Personal Options’ screen.

Scroll down the screen to the bottom until you see ‘New Password’ text box. Fill it with your new password and re-type the password at the second text box then click ‘Update Profile’ to save it.

Then click ‘Visit Site’ to see your page.
Congratulation, you have successfully installed WordPress in your system.


nice post 🙂 keep on going…
cool
Hi thank for your sharing.
Cheer!!!
SEO is important for webmaster
Free sumit your website to my directory. free for you. Good for make blacklink and make more traffic.
I found your site on technorati and read a few of your other posts. Keep up the good work. I just added your RSS feed to my Google News Reader. Looking forward to reading more from you down the road!
..] Более подробно можно ознакомиться по этой ссылке ..]
здесь видел ет gamebulletin.ru
one more nice topic in your blog and nice comments too keep it up, If you advise some more related links to topic. I’m very interested in CMS and all its related subjects.
Very useful information. Thanks for this. You got a great blog .I will be interested in more similar topics.I’m very interested in CMS and all its related subjects.
It’s a very interesting subject I was looking around about more information but you got really what i was looking for in your article so thanks and keep it up you have a great blog .
I’m very interested in CMS and all its related subjects.
Итак, как видите слухи о смерти раздела ‘Кампусные сети’ были несколько преувеличены =) Как много в сети заброшенных сайтов! Рождение сети.
http://waet.ru/
Online консультация гинекология.
wear diapers dont you – dilpreet does to