Feeds:
Posts
Comments

Archive for the ‘Internet Connection’ Category

Speedtest-cli is an application to check your Internet Speed with command line in linux terminal. This program is written with python and using speedtest.net as the source.
There are few guidelines in the Internet that mentioned how to install it. In this tutorial, I use Xubuntu 11.10 with xfce 4.8 as desktop environtment.

First, I’ve tried to install via apt-get install but it didn’t work for me.

$ sudo apt-get install speedtest-cli
[sudo] password for darklinux:
Reading package lists... Done
Building dependency tree
Reading state information... Done
E: Unable to locate package speedtest-cli

Then I tried to install via PIP (package manager for Python packages), still didn’t work also.

$ pip install speedtest-cli
Downloading/unpacking speedtest-cli
Cannot fetch index base URL http://pypi.python.org/simple/
Could not find any downloads that satisfy the requirement speedtest-cli
No distributions at all found for speedtest-cli
Storing complete log in /home/darklinux/.pip/pip.log

Finally, I download directly from the source via github.

$ git clone https://github.com/sivel/speedtest-cli
Cloning into speedtest-cli...
remote: Enumerating objects: 1150, done.
remote: Total 1150 (delta 0), reused 0 (delta 0), pack-reused 1150
Receiving objects: 100% (1150/1150), 310.06 KiB | 32 KiB/s, done.
Resolving deltas: 100% (684/684), done.
$ ls -l speedtest-cli/
total 112
-rw-rw-r-- 1 darklinux darklinux 1671 2019-05-12 09:40 CONTRIBUTING.md
-rw-rw-r-- 1 darklinux darklinux 11358 2019-05-12 09:40 LICENSE
-rw-rw-r-- 1 darklinux darklinux 35 2019-05-12 09:40 MANIFEST.in
-rw-rw-r-- 1 darklinux darklinux 5606 2019-05-12 09:40 README.rst
-rw-rw-r-- 1 darklinux darklinux 20 2019-05-12 09:40 setup.cfg
-rw-rw-r-- 1 darklinux darklinux 3272 2019-05-12 09:40 setup.py
-rw-rw-r-- 1 darklinux darklinux 3039 2019-05-12 09:40 speedtest-cli.1
-rwxrwxr-x 1 darklinux darklinux 63234 2019-05-12 09:40 speedtest.py
drwxrwxr-x 3 darklinux darklinux 4096 2019-05-12 09:40 tests
-rw-rw-r-- 1 darklinux darklinux 497 2019-05-12 09:40 tox.ini
$

speedtest01
(more…)

Read Full Post »

AXIS is one many GSM providers available in Indonesia. I will show you how to setup internet connection with Axis and Nokia 5320 express music.

How to setup?
First, you have to setup the wvdial.conf file. You can use your Linux terminal or edit it with any text editor. In this article, I will use ‘vim’ because for me it’s very simple and easy to use.
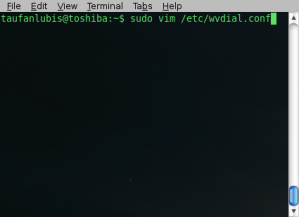
Open your Linux Terminal (Applications > Accessories > Terminal) then type: ‘sudo vim /etc/wvdial.conf‘.
connection_axis01

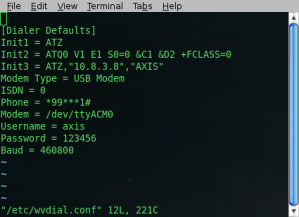
Then type the configuration below:
The Baud value will be depend on your mobile phone. Usually the phone will only GPRS speed will have around 230000.
connection_axis02

(more…)

Read Full Post »

I bought Linksys because the price is not too expensive and I’ve seen my friend use it with Linux. I choose Linksys WAP54G because that it was displayed at the store. There is no explanation that it can be run with Linux. The installation CD is only available for Windows. I though it’s ok, my friend use it so I’m sure that there will be no problem with me.

Then I called him, he said, “You can set it up using Web browser with IP address 192.168.1.1”. This is the default IP for most Linksys products. I turned on the device, plugged the network cable to my laptop, changed my IP address to 192.168.1.2, and test the connection with ping and got this message:

taufanlubis@toshiba:~$ ping 192.168.1.1

PING 192.168.1.1 (192.168.1.1) 56(84) bytes of data.

From 192.168.1.2 icmp_seq=1 Destination Host Unreachable

Mean that the default IP is different.

The only way to see the default IP is run with its CD installer and which I have to run it on windows. Lucky I still have my old PC that use XP. Finally, I found that the default IP is 192.168.1.245.

Set your IP address in the same subnet with Linksys IP.

First you set your have to set IP address in the same subnet with Linksys. If Linksys uses 192.168.1.245 then you can use from 192.168.1.1-192.168.1.244 or 192.168.1.246-192.168.1.254.

To change the IP, open System > Administration > Network > Wired Connection > Properties > Disable ‘enable roaming mode’, Static IP address > Fill 192.168.1.2 (at IP address) and 255.255.255.0 (at subnet mask).

Or

you can temporary change through Linux terminal, open Application > Accessories > Terminal type:

taufanlubis@toshiba:~$ sudo ifconfig eth0 192.168.1.2 netmask 255.255.255.0

taufanlubis@toshiba:~$ ping 192.168.1.245

PING 192.168.1.245 (192.168.1.245) 56(84) bytes of data.

64 bytes from 192.168.1.245: icmp_seq=1 ttl=64 time=2.87 ms

64 bytes from 192.168.1.245: icmp_seq=2 ttl=64 time=1.03 ms

64 bytes from 192.168.1.245: icmp_seq=3 ttl=64 time=0.994 ms

64 bytes from 192.168.1.245: icmp_seq=4 ttl=64 time=1.06 ms

64 bytes from 192.168.1.245: icmp_seq=5 ttl=64 time=0.980 ms

64 bytes from 192.168.1.245: icmp_seq=6 ttl=64 time=1.03 ms

64 bytes from 192.168.1.245: icmp_seq=7 ttl=64 time=1.02 ms

64 bytes from 192.168.1.245: icmp_seq=8 ttl=64 time=1.13 ms

64 bytes from 192.168.1.245: icmp_seq=9 ttl=64 time=1.10 ms

64 bytes from 192.168.1.245: icmp_seq=10 ttl=64 time=1.08 ms (Ctrl-C)

— 192.168.1.245 ping statistics —

10 packets transmitted, 10 received, 0% packet loss, time 9000ms

rtt min/avg/max/mdev = 0.980/1.231/2.871/0.550 ms

taufanlubis@toshiba:~$

Well, everything is OK, now I can start to set the configuration using my Fire fox.

Before we go to that subject, I want to describe a bit about Linksys WAP54G that I use.

About Linksys WAP54G

Linksys WAP54G is product of Linksys-A division of Cisco System, Inc. It’s compatible with Wireless-B (802.11b) and Wireless-G (802.11g). Data rates up to 54Mbps in Wireless-G mode and up to 11Mbps in Wireless-B mode.

It has advanced wireless security 128-bit WPA encryption, MAC filtering and free trial of maximum security Linksys Wireless Guard WPA-RADIUS service. You can set Linksys as Access Point (default), AP client, Wireless repeater and Wireless Bridge.

For a note, when you set it as ‘AP client’ and ‘wireless bridge’ mode, this device will only communicate with another Linksys Access Point (WAP54G).

When you set to ‘wireless repeater’ mode, this device will only communicate with another Linksys Access Point (WAP54G) and Linksys wireless-G router (WRT54G).

Setting Linksys using Firefox

If you can connect to Linksys then open your web browser, type 192.168.1.245 in the URL and press Enter.

You will get a screen below if your are success.

linksys1.png

DON’T FILL the user name, just go to ‘Password’ and put ‘admin‘ as a password then click ‘OK’.


Linksys doesn’t use user name as the default.

You will get a main screen below is your login is success.

linksys2.png

Just change anything you want, click save, wait while the ‘Linksys’ Logo’ will blink to white color and go back to its original color after the setup has done.

To test the connection, choose the wireless network, open a Linux terminal and ping the Linksys.

Read Full Post »

WIFONE is wireless phone for home or office. This phone has been designed to operate on the IS-2000 Air Protocol over the 800MHz band. And the phone has the advanced user interface similar to mobile phone. It has greatly enchanced voice clarity and provides various advanced features.

There are 2 cable connections based on its type, Serial cable and USB cable. I suggest to use USB cable, much faster.

When you connect the phone using USB cable in your computer and you type ‘lsusb’, it will be recognized as LG Electronics Cellphone. Although it’s only packaged with Windows driver, it works smoothly with Ubuntu Gutsy.

It will cost you Rp 6000 per hour (now, may be less in the future) or at about 0.6 cent US$, with 145kbps speed). In Indonesia, it’s provided by Bakrie Telecom.

taufanlubis@toshiba:~$ lsusb

Bus 005 Device 002: ID 04f2:b008 Chicony Electronics Co., Ltd
Bus 005 Device 001: ID 0000:0000
Bus 004 Device 001: ID 0000:0000
Bus 001 Device 002: ID 1004:6000 LG Electronics, Inc. VX4400/VX6000 Cellphone
Bus 001 Device 001: ID 0000:0000
Bus 002 Device 001: ID 0000:0000
Bus 003 Device 001: ID 0000:0000

taufanlubis@toshiba:~$

wifone.jpg

I’ve been using Windows for 15 years, I was a Visual Basic programmer and moderator for join_the_vb_family@yahoogroups.com, so there is no doubt that I don’t know how to install just a modem.

These are the time comparisons when I tried to install wifone in both Gutsy and XP:

Installation in XP (take at about 10 minutes + reading the manual)

  • Installation with CD driver

  • Plug in the cable (device recognized)

  • Reboot the computer

  • Ready to use!!!


Installation in Gutsy (take at about 3 minutes, some data from the manual and no reboot).

  • Connect the phone to my computer

  • Configure with it with ‘wvdialconfig

  • Edit file ‘/etc/wvdial.conf

  • Ready to use!!!!


But, after the installation, Windows only need 3 seconds to process until I can connect to the internet and Gutsy need at about 10 seconds.


Below are the details

Step 1. Configure with it with ‘wvdialconfig’

taufanlubis@toshiba:~$ sudo wvdialconf

[sudo] password for taufanlubis:
Editing `/etc/wvdial.conf’.
Scanning your serial ports for a modem.
Modem Port Scan<*1>: S0 S1 S2 S3
WvModem<*1>: Cannot get information for serial port.
ttyACM0<*1>: ATQ0 V1 E1 — OK
ttyACM0<*1>: ATQ0 V1 E1 Z — OK
ttyACM0<*1>: ATQ0 V1 E1 S0=0 — OK
ttyACM0<*1>: ATQ0 V1 E1 S0=0 &C1 — OK
ttyACM0<*1>: ATQ0 V1 E1 S0=0 &C1 &D2 — OK
ttyACM0<*1>: ATQ0 V1 E1 S0=0 &C1 &D2 +FCLASS=0 — OK
ttyACM0<*1>: Modem Identifier: ATI — 115200
ttyACM0<*1>: Speed 4800: AT — OK
ttyACM0<*1>: Speed 9600: AT — OK
ttyACM0<*1>: Speed 19200: AT — OK
ttyACM0<*1>: Speed 38400: AT — OK
ttyACM0<*1>: Speed 57600: AT — OK
ttyACM0<*1>: Speed 115200: AT — OK
ttyACM0<*1>: Speed 230400: AT — OK
ttyACM0<*1>: Speed 460800: AT — OK
ttyACM0<*1>: Max speed is 460800; that should be safe.
ttyACM0<*1>: ATQ0 V1 E1 S0=0 &C1 &D2 +FCLASS=0 — OK
Found an USB modem on /dev/ttyACM0.

Modem configuration written to /etc/wvdial.conf.
ttyACM0<Info>: Speed 460800; init “ATQ0 V1 E1 S0=0 &C1 &D2 +FCLASS=0”

taufanlubis@toshiba:~$


Step 2. Edit file ‘/etc/wvdial.conf’

[Dialer Defaults]
Init2 = ATQ0 V1 E1 S0=0 &C1 &D2 +FCLASS=0
Modem Type = USB Modem
; Phone = <Target Phone Number>
ISDN = 0
; Username = <Your Login Name>
Init1 = ATZ
; Password = <Your Password>
Modem = /dev/ttyACM0
Baud = 460800


Change to:


[Dialer Defaults]
Init1 = ATQ0 V1 E1
Init2 = ATQ0 V1 E1 Z
Init3 = ATQ0 V1 E1 S0=0
Init4 = ATQ0 V1 E1 S0=0 &C1
Init5 = ATQ0 V1 E1 S0=0 &C1 &D2
Init6 = ATQ0 V1 E1 S0=0 &C1 &D2 +FCLASS=0
Modem Type = USB Modem
Baud = 460800
Modem = /dev/ttyACM0


[Dialer WIFONE]
Username = wifone (data taken from the manual)
Init7 = AT+crm=1;$lgpkt=3 (data taken from the manual)
Password = wifone (data taken from the manual)
Phone = #777 (data taken from the manual)


Step 3. Ready to use.

taufanlubis@toshiba:~$ sudo wvdial WIFONE

taufanlubis@toshiba:~$ sudo wvdial WIFONE

[sudo] password for taufanlubis:
WvDial<*1>: WvDial: Internet dialer version 1.56
WvModem<*1>: Cannot get information for serial port.
WvDial<*1>: Initializing modem.
WvDial<*1>: Sending: ATQ0 V1 E1
WvDial Modem<*1>: OK
WvDial<*1>: Sending: ATQ0 V1 E1 Z
WvDial Modem<*1>: ATQ0 V1 E1 Z
WvDial Modem<*1>: OK
WvDial<*1>: Sending: ATQ0 V1 E1 S0=0
WvDial Modem<*1>: ATQ0 V1 E1 S0=0
WvDial Modem<*1>: OK
WvDial<*1>: Sending: ATQ0 V1 E1 S0=0 &C1
WvDial Modem<*1>: ATQ0 V1 E1 S0=0 &C1
WvDial Modem<*1>: OK
WvDial<*1>: Sending: ATQ0 V1 E1 S0=0 &C1 &D2
WvDial Modem<*1>: ATQ0 V1 E1 S0=0 &C1 &D2
WvDial Modem<*1>: OK
WvDial<*1>: Sending: AT+crm=1;$lgpkt=3
WvDial Modem<*1>: AT+crm=1;$lgpkt=3
WvDial Modem<*1>: OK
WvDial<*1>: Modem initialized.
WvDial<*1>: Sending: ATDT#777
WvDial<*1>: Waiting for carrier.
WvDial Modem<*1>: ATDT#777
WvDial Modem<*1>: CONNECT
WvDial<*1>: Carrier detected. Waiting for prompt.
WvDial<Notice>: Don’t know what to do! Starting pppd and hoping for the best.
WvDial<Notice>: Starting pppd at Sun Jan 6 21:28:18 2008
WvDial<Notice>: Pid of pppd: 7465
WvDial<*1>: Using interface ppp0
WvDial<*1>: pppd: �
6][08]
WvDial<*1>: pppd: �
6][08]
WvDial<*1>: pppd: �
6][08]
WvDial<*1>: pppd: �
6][08]
WvDial<*1>: pppd: �
6][08]
WvDial<*1>: pppd: �
6][08]
WvDial<*1>: local IP address 10.66.38.199
WvDial<*1>: pppd: �
6][08]
WvDial<*1>: remote IP address 192.168.240.83
WvDial<*1>: pppd: �
6][08]
WvDial<*1>: primary DNS address 202.171.1.2
WvDial<*1>: pppd: �
6][08]
WvDial<*1>: secondary DNS address 202.171.1.18
WvDial<*1>: pppd: �
6][08]


taufanlubis@toshiba:~$ ping http://www.google.com (for connection testing)

PING http://www.l.google.com (74.125.47.103) 56(84) bytes of data.
64 bytes from 74.125.47.103: icmp_seq=1 ttl=232 time=637 ms

Read Full Post »

I bought this wireless lan card when I used XP before. There is no website or company name displayed on the box. The only information that I have is only ‘Made in Taiwan‘ and ‘MAC ID; 000B6B00C4B8‘. That’s it.

Actually, you can use MAC ID to get information about the company that build the product.

After googling, I found a good website to find information about MAC address.

http://www.coffer.com/mac_find/

Just put your MAC ID and see the result. When I put my MAC ID, the information that I have is:
Vendor/Ethernet MAC Address Lookup and Search
MAC Address or Vendor to look for:
Search by vendor. For Example: “apple” or “allied”
Search by MAC Address. For Example: “00:13:A9” or “00-80-C7” or “000420”
To lookup MAC address “08:00:69:02:01:FC”:
enter first 6 characters “08:00:69”
or full MAC address “08:00:69:02:01:FC”.
Database last updated: Sep 9, 2007
Search results for “000b6b00c4b8
MAC Address
Prefix Vendor

000B6B Wistron Neweb Corp.

Now, I know that the vendor is Wistron Neweb Corp. Then, I dig more information about WLAN from Wiston Neweb Corp. Finally, I got a good information mentioned that WLAN card bus is the same product like Realtek. We know that Realtek works very well in Ubuntu. Mean, that I can use this WLAN in Ubuntu.


How can it work with no driver for linux?

If we know that Realtek works in Linux, that’s a good start. If we don’t have the driver for linux then just use the windows one. You need a module named ndiswrapper to make it run.

There are 2 main files for ndiswrapper, ndiswrapper-common and ndiswrapper-utils-1.9. So, you have to download both of it.


Step 1. Install ndiswrapper-common and ndiswrapper-utils-1.9

taufanlubis@zyrex:~$ sudo apt-get install ndiswrapper-common ndiswrapper-utils-1.9

Reading package lists… Done

Building dependency tree

Reading state information… Done

ndiswrapper-common is already the newest version.

Suggested packages:

ndiswrapper-source

The following NEW packages will be installed:

ndiswrapper-utils-1.9

0 upgraded, 1 newly installed, 0 to remove and 14 not upgraded.

Need to get 32.1kB of archives.

After unpacking 123kB of additional disk space will be used.

Get:1 http://archive.ubuntu.com feisty/main ndiswrapper-utils-1.9 1.38-1ubuntu1 [32.1kB]

Fetched 32.1kB in 1s (19.7kB/s)

Selecting previously deselected package ndiswrapper-utils-1.9.

(Reading database … 154966 files and directories currently installed.)

Unpacking ndiswrapper-utils-1.9 (from …/ndiswrapper-utils-1.9_1.38-1ubuntu1_i386.deb) …

Setting up ndiswrapper-utils-1.9 (1.38-1ubuntu1) …

taufanlubis@zyrex:~$


Step 2. Disable native (free) Prism54 drivers.

Ubuntu provides wireless driver also as default. You have to disable it, otherwise it will create a conflict with windows driver.

taufanlubis@PC:~$ sudo gedit /etc/modprobe.d/blacklist

……..

……..

# disable native (free) Prism54 drivers

blacklist prism54pci

blacklist prism54common


Step 3. Copy your windows driver to home directory.

The location of your driver will be depend on your WLAN card installer. Just browse your windows and search for the location.

For example, my WLAN windows drivers are located in:

C:\Program Files\IEEE 802.11b WLAN Cardbus Utility and Driver\XP_Driver

You will need 2 files from windows drivers.

  • File setup information: NETR8180.inf

  • File system: rtl8180.sys


Step 4. Install your windows driver in Ubuntu with Ndiswrapper.

taufanlubis@zyrex:~$ sudo ndiswrapper-1.9 -i netr8180.inf

installing netr8180 …

taufanlubis@zyrex:~$


Check ndiswrapper driver list

taufanlubis@zyrex:~$ ndiswrapper -l

netr8180 : driver installed


Check Wireless network interface configuration

taufanlubis@zyrex:~$ iwconfig

lo no wireless extensions.

eth0 no wireless extensions.

wlan0 IEEE 802.11b ESSID:off/any

Mode:Auto Frequency:2.412 GHz Access Point: Not-Associated

Bit Rate=11 Mb/s Tx-Power:20 dBm Sensitivity=0/3

RTS thr=2432 B Fragment thr=2432 B

Power Management:off

Link Quality:0 Signal level:0 Noise level:0

Rx invalid nwid:0 Rx invalid crypt:0 Rx invalid frag:0

Tx excessive retries:0 Invalid misc:0 Missed beacon:0

taufanlubis@zyrex:~$


Step 5. Edit /etc/network/interafaces, add:

auto wlan0

iface wlan0 inet dhcp


taufanlubis@zyrex:~$ sudo gedit /etc/network/interfaces

auto lo

iface lo inet loopback


iface eth0 inet dhcp


auto eth1

iface eth1 inet dhcp


auto eth2

iface eth2 inet dhcp


auto ath0

iface ath0 inet dhcp


auto wlan0

iface wlan0 inet dhcp


auto eth0


Step 6. Put your PCMCIA WLAN card in, and load ndiswrapper module

taufanlubis@zyrex:~$ sudo modprobe ndiswrapper

You will see, your card’s lamp will start blinking.


Step 7. Restart network

taufanlubis@zyrex:~$ sudo /etc/init.d/networking restart


Step 8. Configure Networking

Open System > Administration > Network, choose the available Hot Spot and set the ip to automatic configuration (DCHP).

wifi.png
Step 9. Check your network configuration status

taufanlubis@zyrex:~$ ifconfig

eth0 Link encap:Ethernet HWaddr 00:90:F5:36:9A:EB

UP BROADCAST MULTICAST MTU:1500 Metric:1

RX packets:0 errors:0 dropped:0 overruns:0 frame:0

TX packets:0 errors:0 dropped:0 overruns:0 carrier:0

collisions:0 txqueuelen:1000

RX bytes:0 (0.0 b) TX bytes:0 (0.0 b)

Interrupt:11 Base address:0xe000


eth0:avah Link encap:Ethernet HWaddr 00:90:F5:36:9A:EB

inet addr:169.254.10.28 Bcast:169.254.255.255 Mask:255.255.0.0

UP BROADCAST MULTICAST MTU:1500 Metric:1

Interrupt:11 Base address:0xe000


lo Link encap:Local Loopback

inet addr:127.0.0.1 Mask:255.0.0.0

inet6 addr: ::1/128 Scope:Host

UP LOOPBACK RUNNING MTU:16436 Metric:1

RX packets:8 errors:0 dropped:0 overruns:0 frame:0

TX packets:8 errors:0 dropped:0 overruns:0 carrier:0

collisions:0 txqueuelen:0

RX bytes:560 (560.0 b) TX bytes:560 (560.0 b)


vbox0 Link encap:Ethernet HWaddr 00:FF:EB:24:6D:F4

inet6 addr: fe80::2ff:ebff:fe24:6df4/64 Scope:Link

UP BROADCAST RUNNING MULTICAST MTU:1500 Metric:1

RX packets:0 errors:0 dropped:0 overruns:0 frame:0

TX packets:0 errors:0 dropped:6 overruns:0 carrier:0

collisions:0 txqueuelen:500

RX bytes:0 (0.0 b) TX bytes:0 (0.0 b)


wlan0 Link encap:Ethernet HWaddr 00:0B:6B:00:C4:B8

inet addr:192.168.1.4 Bcast:192.168.1.255 Mask:255.255.255.0

inet6 addr: fe80::20b:6bff:fe00:c4b8/64 Scope:Link

UP BROADCAST RUNNING MULTICAST MTU:1500 Metric:1

RX packets:32 errors:0 dropped:4 overruns:0 frame:0

TX packets:94 errors:0 dropped:0 overruns:0 carrier:0

collisions:0 txqueuelen:1000

RX bytes:4956 (4.8 KB) TX bytes:9765 (9.5 KB)

Interrupt:5 Memory:dea1c000-dea1c100


taufanlubis@zyrex:~$


Step 10. Test connection

taufanlubis@zyrex:~$ ping http://www.google.com

PING http://www.l.google.com (64.233.189.104) 56(84) bytes of data.

64 bytes from hk-in-f104.google.com (64.233.189.104): icmp_seq=1 ttl=241 time=3054 ms

64 bytes from hk-in-f104.google.com (64.233.189.104): icmp_seq=2 ttl=241 time=3276 ms

64 bytes from hk-in-f104.google.com (64.233.189.104): icmp_seq=3 ttl=241 time=3484 ms


http://www.l.google.com ping statistics —

7 packets transmitted, 3 received, 57% packet loss, time 5999ms

rtt min/avg/max/mdev = 3054.540/3271.901/3484.766/175.674 ms, pipe 4

taufanlubis@zyrex:~$

Now, you are ready to access the internet.

Read Full Post »

Default dialer below will be depend on your mobile type. In this setup, I use Nokia 6610 with CA42 cable. List of CDMA and GSM providers below are based in Indonesia only.

For example, your cureent GSM card is Simpati, then just type:

taufanlubis@zyrex:~$ sudo wvdial SIMPATI


[Dialer Defaults]

Init1 = ATZ

Init2 = ATQ0 V1 E1 S0=0 &C1 &D2 +FCLASS=0

Init3 = AT+GMM

Init4 = ATI1

Init5 = ATI2

Init6 = ATI3

Modem Type = USB Modem

ISDN = 0

Modem = /dev/ttyACM0

Baud = 56400


[Dialer PROXL]

Phone = *99***1#

Username = “xlgprs”

Password = “proxl”

Init7 = ATZ,”202.152.240.50″,”www.xlgrps.net”


[Dialer SIMPATI]

Phone = *99***1#

Username = “wap”

Password = “wap123”

Init7 = ATZ,”10.1.89.130″,”telkomsel”


[Dialer AS]

Phone = *99***1#

Username = “wap”

Password = “wap123”

Init7 = ATZ,”10.1.89.130″,”telkomsel”


[Dialer HALO]

Phone = *99***1#

Username = “wap”

Password = “wap123”

Init7 = ATZ,”10.1.89.130″,”telkomsel”


[Dialer IM3]

Phone = *99***1#

Username = “gprs”

Password = “im3”

Init7 = ATZ,”010.019.019.019″,”www.indosat-m3.net”


[Dialer MENTARI]

Phone = *99***1#

Username = “indosat”

Password = “indosat”

Init7 = ATZ,”010.019.019.019″,”indosatgrps”


[Dialer MATRIX]

Phone = *99***1#

Username = “”

Password = “”

Init7 = ATZ,”202.152.162.250″,”satelindogrps.com”


[Dialer FREN]

Phone = #777

Username = “m8”

Password = “m8”

Init7 = ATZ,”10.21.5.201″,””


[Dialer FLEXI]

Phone = #777

Username = “telkomnet@flexi”

Password = “telkom”

Init7 = ATZ,”10.177.7.7″,””


[Dialer STARONE]

Phone = #777

Username = “Starone”

Password = “indosat”

Init7 = ATZ,”192.168.50.60″,””


Read Full Post »

1. Check your Nokia 6610 configuration with wvdialconf

taufanlubis@zyrex:/etc$ sudo wvdialconf /etc/wvdial.conf

Editing `/etc/wvdial.conf’.


Scanning your serial ports for a modem.


ttyS0<*1>: ATQ0 V1 E1 — failed with 2400 baud, next try: 9600 baud

ttyS0<*1>: ATQ0 V1 E1 — failed with 9600 baud, next try: 115200 baud

ttyS0<*1>: ATQ0 V1 E1 — and failed too at 115200, giving up.

Modem Port Scan<*1>: S1 S2 S3

WvModem<*1>: Cannot get information for serial port.

ttyACM0<*1>: ATQ0 V1 E1 — OK

ttyACM0<*1>: ATQ0 V1 E1 Z — OK

ttyACM0<*1>: ATQ0 V1 E1 S0=0 — OK

ttyACM0<*1>: ATQ0 V1 E1 S0=0 &C1 — OK

ttyACM0<*1>: ATQ0 V1 E1 S0=0 &C1 &D2 — OK

ttyACM0<*1>: ATQ0 V1 E1 S0=0 &C1 &D2 +FCLASS=0 — OK

ttyACM0<*1>: Modem Identifier: ATI — Nokia

ttyACM0<*1>: Speed 4800: AT — OK

ttyACM0<*1>: Speed 9600: AT — OK

ttyACM0<*1>: Speed 19200: AT — OK

ttyACM0<*1>: Speed 38400: AT — OK

ttyACM0<*1>: Speed 57600: AT — OK

ttyACM0<*1>: Speed 115200: AT — OK

ttyACM0<*1>: Speed 230400: AT — OK

ttyACM0<*1>: Speed 460800: AT — ��

ttyACM0<*1>: Speed 460800: AT — ��

ttyACM0<*1>: Speed 460800: AT — ��

ttyACM0<*1>: Max speed is 230400; that should be safe.

ttyACM0<*1>: ATQ0 V1 E1 S0=0 &C1 &D2 +FCLASS=0 — OK


Found an USB modem on /dev/ttyACM0.

/etc/wvdial.conf<Warn>: Can’t open ‘/etc/wvdial.conf’ for reading: No such file or directory

/etc/wvdial.conf<Warn>: …starting with blank configuration.

Modem configuration written to /etc/wvdial.conf.

ttyACM0<Info>: Speed 230400; init “ATQ0 V1 E1 S0=0 &C1 &D2 +FCLASS=0”

taufanlubis@zyrex:/etc$


2. Edit your wvdial.conf file at /etc

taufanlubis@zyrex:/etc$ sudo gedit /etc/wvdial.conf

[Dialer Defaults]

Init2 = ATQ0 V1 E1 S0=0 &C1 &D2 +FCLASS=0

Modem Type = USB Modem

; Phone = <Target Phone Number>

ISDN = 0

; Username = <Your Login Name>

Init1 = ATZ

; Password = <Your Password>

Modem = /dev/ttyACM0

Baud = 230400


The configuration in my laptop is:

[Dialer Defaults]

Init1 = ATZ

Init2 = ATQ0 V1 E1 S0=0 &C1 &D2 +FCLASS=0

Init3 = AT+GMM

Init4 = ATI1

Init5 = ATI2

Init6 = ATI3

Modem Type = USB Modem

ISDN = 0

Modem = /dev/ttyACM0

Baud = 56400


[Dialer PROXL]

Phone = *99***1#

Username = “xlgprs”

Password = “proxl”

Init7 = ATZ,”202.152.240.50″,”www.xlgrps.net”


Where I got the Init1, Init3, Init4, Init5, Init6, Modem Type, ISDN, Baud and Init7 data?

I took it from my nokia configuration in Windows System. Because, nokia still does not provide their software in linux. So, the easy way is just copy it to linux.


3. Check the configuration again to make sure everything is right.

taufanlubis@zyrex:~$ cat /etc/wvdial.conf

[Dialer Defaults]

Init1 = ATZ

Init2 = ATQ0 V1 E1 S0=0 &C1 &D2 +FCLASS=0

Init3 = AT+GMM

Init4 = ATI1

Init5 = ATI2

Init6 = ATI3

Modem Type = USB Modem

ISDN = 0

Modem = /dev/ttyACM0

Baud = 56400


[Dialer PROXL]

Phone = *99***1#

Username = “xlgprs”

Password = “proxl”

Init7 = ATZ,”202.152.240.50″,”www.xlgrps.net


4. Set your setting in Nokia 6110 to your grps provider.

In this case, I use PRO XL (indonesia mobile service provider)

Open Menu > Service > Setting > Active service settings > XL GPRS


5. Test the connection

Plug in the CA42 cable to your Nokia 6110 and your computer.

taufanlubis@zyrex:~$ sudo wvdial PROXL

Password:

–> WvDial: Internet dialer version 1.56

–> Cannot get information for serial port.

–> Initializing modem.

–> Sending: ATZ

ATZ

OK

–> Sending: ATQ0 V1 E1 S0=0 &C1 &D2 +FCLASS=0

ATQ0 V1 E1 S0=0 &C1 &D2 +FCLASS=0

OK

–> Sending: AT+GMM

AT+GMM

Nokia 6610

OK

–> Sending: ATI1

ATI1

351350307697080

OK

–> Sending: ATI2

ATI2

V 5.65

19-Nov-04

NHL-4U

(c) Nokia.

OK

–> Sending: ATI3

ATI3

Nokia 6610

OK

–> Sending: ATZ,”202.152.240.50″,”www.xlgrps.net”

ATZ,”202.152.240.50″,”www.xlgrps.net”

OK

–> Modem initialized.

–> Sending: ATDT*99***1#

–> Waiting for carrier.

ATDT*99***1#

CONNECT

~[7f]}#@!}!} } }2}#}$@#}!}$}%\}”}&} }*} } g}%~

–> Carrier detected. Waiting for prompt.

~[7f]}#@!}!} } }2}#}$@#}!}$}%\}”}&} }*} } g}%~

–> PPP negotiation detected.

–> Starting pppd at Sat Aug 25 05:25:04 2007

–> Pid of pppd: 5978

–> pppd: �[05][06][08]([04][06][08]�[07][06][08]�[0c][06][08]8

–> [06][08]�

–> [06][08]

–> Using interface ppp0

–> pppd: �[05][06][08]([04][06][08]�[07][06][08]�[0c][06][08]8

–> [06][08]�

–> [06][08]

–> pppd: �[05][06][08]([04][06][08]�[07][06][08]�[0c][06][08]8

–> [06][08]�

–> [06][08]

–> pppd: �[05][06][08]([04][06][08]�[07][06][08]�[0c][06][08]8

–> [06][08]�

–> [06][08]

–> pppd: �[05][06][08]([04][06][08]�[07][06][08]�[0c][06][08]8

–> [06][08]�

–> [06][08]

–> pppd: �[05][06][08]([04][06][08]�[07][06][08]�[0c][06][08]8

–> [06][08]�

–> [06][08]

–> local IP address 172.26.8.127

–> pppd: �[05][06][08]([04][06][08]�[07][06][08]�[0c][06][08]8

–> [06][08]�

–> [06][08]

–> remote IP address 10.6.6.6

–> pppd: �[05][06][08]([04][06][08]�[07][06][08]�[0c][06][08]8

–> [06][08]�

–> [06][08]

–> primary DNS address 202.152.254.245

–> pppd: �[05][06][08]([04][06][08]�[07][06][08]�[0c][06][08]8

–> [06][08]�

–> [06][08]

–> secondary DNS address 202.152.254.246

–> pppd: �[05][06][08]([04][06][08]�[07][06][08]�[0c][06][08]8

–> [06][08]�

–> [06][08]


6. Test with a ping

taufanlubis@zyrex:~$ ping http://www.yahoo.com

PING http://www.yahoo-ht3.akadns.net (209.131.36.158) 56(84) bytes of data.

If you can see the Yahoo IP, mean, you are now connected to the internet.

Just press Ctrl-C to stop the PING proccess.

Now, you are ready to access……

Happy, trying…..


Why still I can not connect to the Internet?

This occurs if you still have the other connection setup in you computer, such as eth0 to LAN.

You may can use ifdown

taufanlubis@zyrex:/etc$ sudo ifdown eth0

It may work but also it may not work. Like me, I still can’t connect to the internet if I just use ifdown.

So, just change the configuration to:

System > Administration > Network > Connections > Wired connection

Set the configuration to ‘Automatic Configuration (DHCP)


Stop the internet connection

Press Ctrl-C to stop the connection

Caught signal 2: Attempting to exit gracefully…

–> Terminating on signal 15

–> pppd: �[05][06][08]([04][06][08]�[07][06][08]�[0c][06][08]8

–> [06][08]�

–> [06][08]

–> Connect time 3.8 minutes.

–> pppd: �[05][06][08]([04][06][08]�[07][06][08]�[0c][06][08]8

–> [06][08]�

–> [06][08]

–> pppd: �[05][06][08]([04][06][08]�[07][06][08]�[0c][06][08]8

–> [06][08]�

–> [06][08]

–> pppd: �[05][06][08]([04][06][08]�[07][06][08]�[0c][06][08]8

–> [06][08]�

–> [06][08]

–> Disconnecting at Sat Aug 25 05:29:00 2007

taufanlubis@zyrex:~$

Read Full Post »